Search This Blog

Friday, November 12, 2010

POR-15 Tank Sealer

Sunday I woke up and started early on finishing the tank. I ran the hairdryer in the tank for a little bit to make sure the tank was "bone dry" as the instruction say it should be. The sealer hardens best in a temperature of 72 degrees Fahrenheit, so I used a small space heater to heat my garage up to about 70ish as it was about 46 degrees out.

After breakfast I removed the hairdryer, sealed up the tank (just duct tape this time), and started mixing the POR-15 tank sealer.

Mixing tank sealer.
Alot of users had commented that this stuff does not come off your skin easily, so I took extra precautions to wear a long sleeve shirt and double layer gloves. I also wore a breathing filter/respirator mask; the fumes are very nasty and I did not want to have the door open the whole time.

After mixing, I poured the sealer through a funnel into the tank. There really didn't seam like too much sealant in there and at first I thought I was going to run out. After sealing the filler hole, I shook the tank slowly to disperse the sealant throughout. I would set the tank in random positions on my workbench so that the sealant could slowly creep over the inner surface of the tank and coat any bare surfaces. After about 30 minutes or so of doing this, I peaked in and checked everything out. The tank looked beautiful, entirely sealed.

Coated inside
Finally, I opened up the holes and let the remaining sealant drip out. There was very little left, about 10 cc's of fluid. It is now Friday and I have let the tank sit upside down in the garage. The solvent smell has left, so I am assuming the tank is cured. I do not have a battery for the bike yet, so I see no reason for me to fill it with gas yet.

The entire process wasn't hard to do, it was quite time consuming though; definitely a weekend project. If I had to make any changes, I wish I would have had more Metal Ready solution. About twice what I had used would have been nice. Also, some sort of metal aggregate would be a nice addition for mechanical rust removal (like a chain or some ball bearings). That is something I did not do, which I would definitely do in the future.

Saturday, November 6, 2010

POR-15 Metal Ready Application

I ended up going to bed last night earlier than expected and never got around to draining the tank. I figured that nothing bad could come from leaving the solution in there overnight and nothing did. After I got home from work I drained the tank and flushed it with water many times.

I evacuated the remaining water, about 10 fl ounces, with my favorite turkey baster/clear tubing combo. It left very little water in there. Next I dumped in the metal ready solution, which is alkaline. It will clean the remaining rust and etch the surface of the tank for the POR-15 coating.

A number of south park episodes and tank turns later, I emptied the tank into a bucket so I can filter and reuse the solution for another project. I boiled 4 or 5 large pots full of water and dumped them each into the tank: dump, shake, drain, dump, shake, drain...

My dump station

I finished clearing the solution and used my turkey baster combo to evacuate the remaining 3 fl ounces of water. The tank looks much cleaner now, there was a significant amount of rust removed. I suppose the rest will be coated with the coating I set in there tomorrow.

Before Metal Ready
After Metal Ready.

Currently, I am drying out the tank with a hair dryer and an air mattress pump. I use the hair dryer for about a half hour and then switch off to the air mattress pump and then I switch back. I want to set the coating tonight, but the tank must be absolutely dry. We will see the progress I make in drying the tank out.

Dryer setup

Friday, November 5, 2010

POR-15 Tank Cleaning

After a hiatus for the past few weeks, I finally had a whole weekend blocked out where I would be able to get some stuff done to the bike. The big process to take is the tank cleaning/etching/coating. Since the tank was a little rusty inside, I had purchased the POR-15 motorcycle tank renewal kit. In the kit comes a marine clean solution, an slightly acidic etching solution, and the famous POR-15 coating kit (along with fibrous patching in case there are pin holes).

POR-15 kit
The first thing I did was remove the tank, the fuel sensor unit, gas cap, and emblems. Now that the tank was naked I had no reservations with taking a garden hose to the thing and cleaning the gunk out from the inside. Not too much "gunk" came out, more like flakes of rust.
My tank drain site.
Next I sealed the fuel filler with a 1.5 inch expansion test stopper. The fuel sending hole was too small for the test stopper, so I slipped a few latex gloves over a foam cone and duct taped it in there. I took a small cork, covered it in a latex glove and duct taped that inside of the fuel exit.

My makeshift plugs
Now I poured hot water into the tank with the marine clean in roughly a 5:1 ratio. POR-15 suggests 5:1 as a best ratio for most applications. I found this suitable since the tank is quite large, this ratio would cover at least 1/3 of the tank at a time.

Tank on its side
I heard some popping and fizzing in the tank when I checked it 30 minutes later. I feared that the solution had eaten through the latex and was now making a mess of styrofoam in my tank. I opened the test plug to peer inside...
Inside the tank
The tank still looks rusty, but I am not surprised, this process was mainly to remove varnish and gunk fuel, which I believe mine was not plagued excessively. Before I go to bed I will drain and rinse tank and let it sit over night to dry. I have to work in the morning, but when I get back I will begin etching.

And of course, I am always being safe wearing my PPE. I learned something in Chem Lab.

PPE!

Sunday, October 17, 2010

Weekend accomplishments.

This weekend I got around to working on the bike.  The first thing I wanted to do it drain the gas tank since the POR-15 tank cleaner/coating is coming in tomorrow.  I started off by draining the carbs' float bowls, which is probably what I should have done when I first bought the bike in August.  I was worried that the gas would already be gummed up in there and/or there would be massive amount of rust in the exiting fuel.  It wasn't that bad actually.  I unscrewed the little bowl screws and released the gas into the packaging from my soldering iron.  The packaging worked perfectly as a nice fuel tray and none of the fuel spilled over the engine.

Float bowl drain screws.

My creative little fuel tray under the float bowls.  Fuel was slight browning.

Emptying the gas tank proved an arduous process.  I thought I would just be able to drain through the petcock, I was wrong.  I had to head back to autozone for a funnel and an adjustable wrench to get the petcock off.  I removed the petcock and drained most of the fuel...slowly.  However a large amount of fuel still remained in some of the cracks and crevices of the tank.  I tried a few different methods, including paper towels to soak it up and siphoning the fuel.  None of these could get the fuel out.  Finally I ran to the grocery store and bought a turkey baster.  This combined with a little tubing at the end worked quite well.  

After draining the tank, I moved on to the next step: the stator and R/R unit.  I tested both for continuity.  I was well pleased to find that the stator seems to be in functioning order (according to continuity tests).  I was ecstatic that the new R/R and my old one (the one that was burned up pretty well) were both fully functional by continuity tests.  


Continuity test on the stator...passed.

Now that the R/R's had passed the tests, I decided to invest a little time in cleaning them up.  I stripped the old R/R of all the burnt up wires and was able to salvage the old connector to the wiring harness. On the new R/R I was able to solder in some new yellow wires which will be insulated and directly soldered to the stator. Hopefully this will help avoid the connector burn outs that caused the original fire.


New wires on the R/R


Before I finished up I decided I would do a little cosmetic work as well. I removed the rear cowl, which had been burnt up and installed the new one.  It's hard to miss this piece.  


Action shot!

Red rear cowl looks good.  Maybe the tank needs a bright color too!


Posted by Picasa

Thursday, October 14, 2010

Updates! New parts, new objectives

I finally got my package in that I had ordered a few weeks ago on ebay.  I got my rear cowl, seat latch, coolant tank, and R/R.  Everything looks to be in good condition so I am pretty happy I'll have some stuff to play with this weekend.

At the end of last weekend I had done some research on how to spruce up the fuel tank and get all the rust out.  I had previously mentioned I was thinking about using the KBS de-rust and sealer product for motorcycles, but I wanted to do a little more research.  The two methods I broke it down to were the electrolysis method and the POR-15 rust remover/sealer for motorcycle method.  The electrolysis method looked interesting, but the hazard of leaving electrical charge from a battery tender into a solution of water and chemicals changed my mind.  The POR-15 method seemed to be proven with all the great reviews it got online.  Kreem was out of question, it seems like this product is outdated and causes more harm than actual rust particles (again, this is from reviews).  I am hoping that the rust in the tank is mainly surface rust and that I don't discover any pinholes when I do the etching of the tank, but the sealer should take care of this issue.  The tank will definitely take a whole weekend.  The process is a 3 step process and the tank must be completely dry between steps.

From the top, everything appears to be surface rust (fingers crossed!)


I was going to order the petcock seal kit from oldbikebarn.com, but I read alot of reviews saying that their service is horrible, so I may hold off on this and seal which seals are actually broken in the petcock.  This will probably be done the weekend I seal the tank.  It will be a good side project when waiting for the tank to dry.


Some gummed up gas on the petcock.


Lastly, I just wanted to show off my new parts.  After reading all the horror stories of connector malfunctions (fires) between the stator and the R/R, I will definitely be hardwiring the stator and the R/R.  By doing this I will also be able to reuse the old stator, so I'll save a few bucks and a little time from not having to change that out.  Apparently the 3 yellow wires that come from the stator do not have any specific order, so I can wire them however I want.  Please correct me if I am wrong.  I may also be able to salvage the old R/R if I rewire it, which I will try to do.

Left: New R/R, Right: Old R/R

New coolant tank, needed the sensor and hose.


So the rear cowl being red does not exactly match the black tank or side covers of the bike, but I just want to get it running so I'm not too concerned.  In the future I'll take black and white pictures and no one be able to tell the difference. The rear cowl is in good condition and only has one chip on it, which I have, so I will be able to epoxy it back on.

BRIGHT Red!
Small chip, this can be fixed.


Posted by Picasa

Saturday, October 9, 2010

New Seat!

So I've been pretty busy for the past few weeks, I haven't been doing much with the bike.  Mostly I have just been doing a little research into the stator and R/R issue.  I may be able to use both of them! I will at least be able to use the stator and will just hardwire it into whatever R/R I get.  Apparently the connection between the R/R and the stator has lead to many failures in this era of Honda motorcycle and can actually catch fire if there are flammable things nearby.
I picked up a new seat from a guy in the area for a decent price.  It is a stock-type seat that looks like it has been recovered recently.  It at least makes the bike more presentable.  The cruiser-style seat, although comfortable, was a bit of an eyesore (even if it wasn't burned through the passenger side).  
Looks so much better with the new seat.
After putting the seat on, I got a little encouragement to do some more stuff.  I cleaned off the grounding wires and the grounding points on the bike.  The battery tray was pretty rusty so this took some time.  After I get the bike running I will probably spray down the battery tray with a little rustoleum to keep it from rusting even worse in the future.

After that I looked around and decided I would tackle the wiring and put it back into the headlight bucket.  Last time I had a few wires that were left disconnected in the wiring bundle.  I looked at the wiring diagram and realized the the black and green were for an accessory and the brown was from the ignition to the accessory. Still had an extra green/ground, I'm not going to worry about it, I couldn't trace it on the wiring diagram at all.  Getting the wiring into the headlight bucket was a huge pain.  I got it in there fine, but I was having difficulty getting the headlight onto the bucket with all the wiring in there.  The wiring was just frustrating me, so at a certain point I thought it wasn't fun and gave it a rest.

The worst part so far.
Hopefully I will get back to it tomorrow when I get a little rest and have some more patience.  Now I am just waiting for a few more of my parts to come in and then all I need to do is treat the tank.  I tested out the seat to see how comfortable it is, about the same as the last.  It doesn't have the smell of burnt fiberglass, big plus.

Testing the new saddle.
Posted by Picasa

Wednesday, September 29, 2010

Project list

So I was all excited that I got the wiring harness and I figured all I would need to do is get a battery and I'd be able to start it up.  However I kinda missed hooking up a few parts...

While checking grounds the other night, I realized that I didn't hook up the regulator/rectifier.  So I reached into my parts bin to fish it out.  Out came a regulator/rectifier (R/R), except it wasn't in as good of condition as I thought it was.  In fact, I think I had erased from my memory how bad of condition it was in.  The R/R has two wire bundles and plugs.  One attached to the stator and the other attached to the wiring harness.  So the one that  attaches to the wiring harness was in fine condition.  On the other hand, the plug that attaches to the stator was non existent! It has burned away in the fire; it was also most likely the source of the fire.  It seems like these older Honda bikes have problems with the R/R?

So then I searched for the stator wire.  Problem #2: there was no plug on the stator wire, fire had melted the plug away, along with the insulation to the wire.  Wires are bare to the core.  Looks like I should be looking for another stator as well.

Problem #3: Petcock leaks about a drop every few minutes.  Looks like this will be a rebuild.

Issues to be addressed before startup:

  • R/R replacement
  • Stator Replacement
  • Petcock Rebuild
    • I will etch/clean/coat tank in this process, thinking of using the KBS product
  • Battery
Issues to be addressed for the bike to be safe:
  • Front fork seals leak- needs rebuild
  • Brake fluid needs cleaning
Luckily I got some parts on ebay for super cheap, they are on their way.  I got a coolant reserve tank (old one had broken sensor), rear cowl (old one was melted), and a seat/helmet lever and lock.  FOR $2.97 + S/H.  Not bad.

Wednesday, September 22, 2010

Installing Wiring Harness

After getting the wiring harness Monday night, I thought I'd definitely be installing it Tuesday night.  However, I took a little break and watched TV with dinner after getting back from a run.  Little break turned into a long break as I got sucked into watching Mad Max 2 on AMC and then Sons of Anarchy.  I was able to spend a few hours on it tonight though, so I'll share my progress with you.

I was able to install the wiring harness in its entirety. I definitely had to jog my memory and figure out how to place everything since the pictures I took did not really show how I ripped everything apart in the headlight.  I was glad that I had the old wiring harness labelled though, I was able to compare it with the new and figure out where things went.  The new one did seem to have a naked section of wire that may have been repaired at some point; I covered this "Boo-boo" with some red electrical tape "bandaid."

Red Electric Tape shows where the Booboo is
One of the difficulties I had was trying to figure out where the ground of the thermoswitch went.  At first I thought it was the ground to the left coil pack, but after checking out the diagram of spaghetti (wiring diagram) provided by the Haynes manual I decided its definitely the thermoswitch ground.  However this does not help me with where it needs to be bolted to though.  Let me know if you know where this goes.

Where does this ground wire bolt to?
I got all the wiring harness done under the tank, so I put that back on.  I proceeded with cleaning up the wiring in the headlight.  I have everything connected in there except for:

  • brown wire- accessory wire?
  • black wire- accessory wire?
  • two grounds to ?- one for turn signals, the other for accessory?
  • a ground from left turn signal
  • a ground from right turn signal
So I need to figure out if the brown, black, green are definitely for accessory and then I need to figure out which ground I am supposed to hook the turn signals up to.
With grab rails and rear cowl on, seat makes it look bad.
To finish up the night, I put the tool box and rear inner fender back on and then continued to add the taillight, rear cowl, grab bars, and seat.  It actually looks really decent...without the seat.  This seat is ugly: 1) It's all burnt up, 2) It's an old man style cruiser seat (but it is comfy!)

Looks like I will be taking a week hiatus as I figure out where some of these wires go and source up a battery  so I can try to get this bike started.  I replaced one of the CDI's, I am just hoping that the other one wasn't too badly burned.  Since there is no test for these, I suppose I will just try to start it and if it only runs on two cylinders, I'll know right away that the burned one will need to be replaced.

The CDI's, the one on the left is definitely questionable.
Posted by Picasa

Monday, September 20, 2010

New Wiring Harness

So I ordered a wiring harness last week and much to my chagrin I didn't receive it until today, Monday.  I definitely wish I had been able to put it back together this weekend, instead all I did was scrub more rust off the frame, battery tray, and polished metal.

One man's trash is another man's treasure

After completely removing the wiring harness, I realized that only a few wires were really damaged.  The worst damage was at the main fuse panel.  I feel like this could have been the source of ignition for the fire, possibly right above the red plug.  I feel that it will be safer to replace the whole harness, so I am glad I have decided to go this route (we will see if I am still glad when I'm trying to figure out how it goes back in the headlight).

Main Fuse, Main Culprit

Left: New Harness, Right: Old Harness

It looks like I'll have my work cut out for me for the foreseeable future.  This wiring harness could use a cleaning before it goes back on.  I am definitely glad I labeled most of the wires/plugs from the existing harness, it should help with putting it back together (you can see some of my masking tape labeling on the wires below.)  Hopefully I will get some work done on this week.


Shiny Fender, the only thing that looks good on this bike.
Posted by Picasa

Tuesday, September 14, 2010

Purchase/Breakdown

I purchased a 1982 Honda VF750 Sabre in mid-August as a winter project.  The bike caught on fire when the previous owner was riding it.  It is not running, mainly due to the wiring harness being melted.  My goal is to rebuild the bike to running condition.

The previous owner dropped the bike off at my house as per sale agreement.  The left side cover had been completely melted, the fire did the most damage to the seat, melting away the left half of the passenger portion.  The rear cowl, side cover, and left grab handle were damaged as well.  The wiring harness was pretty much destroyed from the gas tank back.  Much to my chagrin, the spark units (aka igniters/ecu's/cdi) were damaged, these are not cheap.  One was heavily damaged and the other one looked okay.

I have two theories to the fire.  The fire definitely originated around fuse block area, because it's the beginning location of the fire. Theory 1: Battery leaked hydrogen gas from overheating (running in a hot day) or overcharging (regulator/rectifier broken), the fuse block ignited the fire somehow.  Theory 2: Fuse block smoldered and lit some combustible material in the seat on fire.  I'm sure testing the regulator will help prove these theories correct/incorrect.


After seat (bottom left corner) and cowl removed


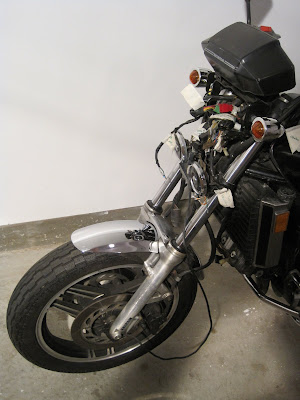
I have slowly removed everything from the rear of the gas tank down to the frame.  Other projects have taken precedent so far (making the garage look pretty by whitewashing the walls).  I have also removed the gas tank and headlight to get the wiring harness out.  Easily the hardest part was getting the wiring harness out of the headlight, Honda really crammed a whole ton of wires into the headlight bucket!

Clean harness under the tank


So far I have purchased a CDI Ignitor, a Fuse Block, and a new rear inner Fender.  I'm holding out on getting the cosmetic stuff, going to see if I can get the bike started before I drop much coin into it.  The fender was a good deal on ebay, couldn't pass it up.

What a rat's nest!


Tonight I ordered the wiring harness, the tool box, and the neutral switch all at once on ebay.  I bought it all from one buyer and he accepted my offers, so I saved on shipping in the long run.  I have also noticed that the forks are weeping a little oil, looks like the step after getting it running will be a fork rebuild, looks like it'll be an opportunity to rebuild the brakes as well.  I'll keep you filled in on the progress.

As she sits, wiring harness removed - thermo switch still connected b/c it's a PIA